Radiant Floor Sandwich Construction on Suspended Floors:
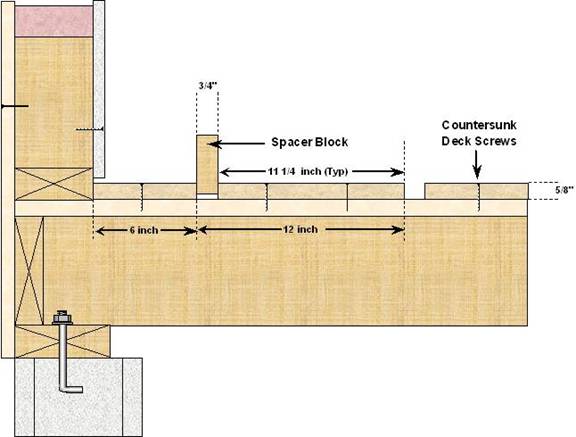
In this installation you are placing the radiant floor over an existing floor or subfloor. You wish to install a high performance radiant panel by minimizing the resistance upward due to floor construction materials. This system results in a minimum rise of 7/8-inch over the existing surface depending on the thickness of materials that are chosen. Start by ripping 4X8 foot underlayment panels in 11 1/4 inch strips and 8 feet long. Some lumber companies provide this service free of charge. You may want a few 5 1/4-inch strips for areas to be placed 6 inches on center. Place the underlayment strips along the perimeter of the room and screw, staple, glue or otherwise fasten these strips in place. Then, complete the layout by using a ¾-inch spacer block for the tubing runs. See the drawing below.
NEXT
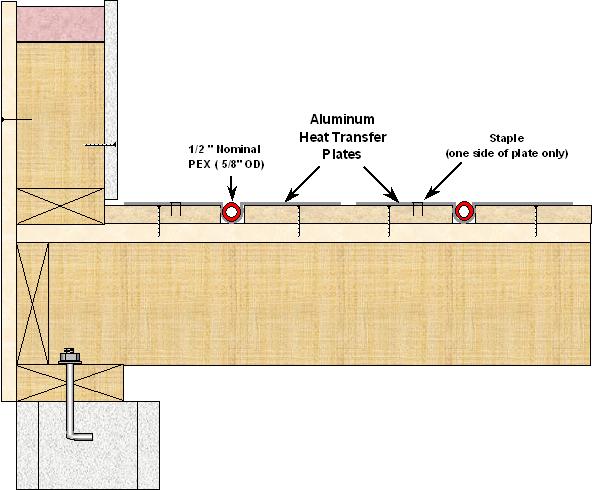
Radiant Floor Sandwich Construction on Suspended Floors: Once the underlayment matrix is in place you are ready to install the aluminum heat conducting plates and the tubing runs. Install the aluminum plates into the groves and fasten the plate to the underlayment using staples, nails or screws. Fasten the plate on one side and in the middle of the plate only until the tubing has been placed in the groove. Then push down on the plate with a hand trawl, while you staple the other side down. Make certain that a minimum of one inch spacing is provided between the plates. Typical spacing between plates is 4 inches for a one plate per two square foot interval. It is helpful while installing the plates to bear each plate against the same side of the groove in order to insure proper alignment of the tubing slots. Next, snap the tubing into the groove and push down while fastening the plate to the underlayment on the opposite side.
NEXT
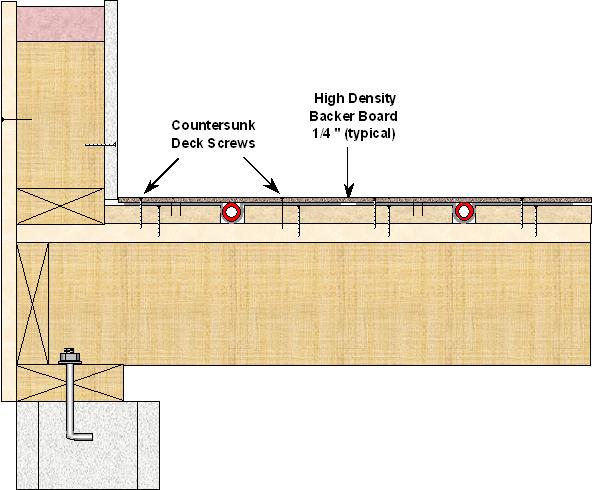
Radiant Floor Sandwich Construction on Suspended Floors: Complete the installation by covering the tubing plates array with a suitable high-density hardboard, cement board, or particleboard, as necessary. If hardwood is to be nailed in place, it may be more practical to eliminate this step and nail the hardwood in place over the plates while it is still possible to see the location of the tubing and avoid nail damage.
NEXT
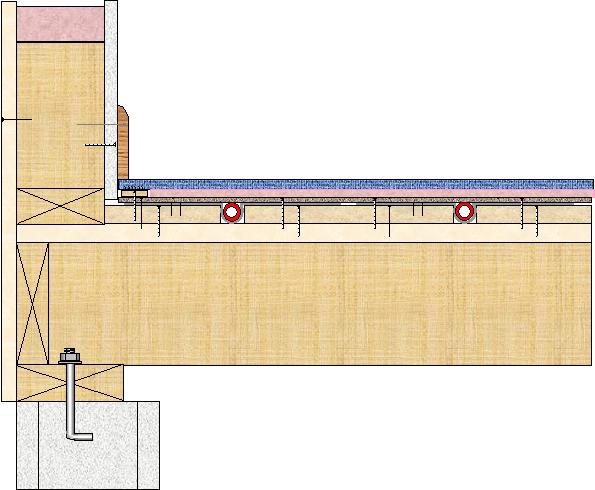
Radiant Floor Sandwich Construction on Suspended Floors: While you are installing the underlayment layer over the tubing and plates, it is helpful to use a large felt tip marker and a straight edge to mark the tubing runs on the top of the underlayment for future reference and to help avoid damaging the tubing with fasteners. This also provides a ready reference for the installers of finish floor coverings.
In some cases it may be helpful to install a drilled “Peg Board” type high-density particleboard as the underlayment layer. The drilled holes make starting the screws easier and also aid in identifying the location of the pipes. Some contractors like this method when placing dense carpet pad over the floor.
If a floating floor is placed over the sandwich construction there may be a requirement for a membrane to aid in the movement of the finished floor.
If solid wood flooring is to be nailed directly to the sandwich construction, there is really no need for an intermediate underlayment placed over the pipes and plates. Without this intermediate layer, overall thickness is reduced, thermal transfer is enhanced and it is much easier to nail down the solid wood without damaging the pipes.
If a floating floor is placed over the sandwich construction there may be a need for some form of membrane to aid the movement of the floating floor. Follow the manufacturer’s recommendations.
When we install engineered flooring over a sandwich constructed floor, we, typically use a construction adhesive between the OSB and the finished wood flooring. This improves the feel of the floor, making it seem much more like solid wood.
NOTE ABOUT NOISE IN PLATES SYSTEMS:
Over the years I have heard some complaints with regard to noise in aluminum plate applications. With the exception of one early system (one installed by my brother-in-law in the late 1980’s), I haven’t had any noise complaints from the hundreds of plate projects I have designed or installed. But, the designer/installer must understand the relationship of the pipe to the plates so that noise can be avoided.
PEX pipe expands at a rate of 1.1 inch per 100 feet per 10 degree rise in temperature. Or, you might say it expands 1.1 inch per ten feet of pipe per 100 degree rise in temperature. If you do the math, a typical heating system will be installed at room temperature (70 degrees F) and operate up to a max of around 150 degrees F. That is an overall rise in temperature of around 80 degrees. If you take 1.1 inch and multiply that by 80%, you get 0.88 inch. That means that a ten foot length of pipe will expand about 7/8 inch when it is heated from 70 to 150 degrees. If the plates are placed close together, all of that expansion must be accommodated in the loop end. The square cut off at the loop ends accommodates most of this expansion. If the runs are very long, however, more expansion must be expected and allowed for at the loop ends.
Also, it is a good idea, when placing the plates within the slots in a sandwich constructed radiant floor, to make certain that each plate is aligned against the same side of the groove as other plates within the same groove. Allowing the plates to wander from side to side in the groove can cause the tubing to hang up as it tries to expand. That could cause some noise as the tubing breaks loose.